


WHAT is it?
Students use the mindmapping tool to generate and develop ideas, and can then refer to it to locate insights.
WHY teach it?
This exercise provides a way for students to present and also reflect on their ideas in a nonlinear and visual way. It can also help students generate a direction for their ideas.
The task connects with observation and idea generation.
Teaching Tips
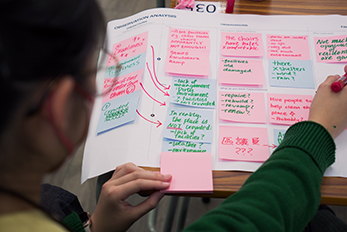
Make sure that EVERYONE is writing; facilitators can make this happen by handing each student a sticky note at the beginning.
HOW to do it?
Instructions:
▸ Introduction (10 mins)
Explain the goal of the session and the several steps that the students will go through.
▸ Setting up the mind map (60 mins)
Define the topic, with a statement rather than a single term, in the centre point. Then decide on the branches for the map:
Basic: how, what, when, where, for whom, with whom
Experience and beyond: failed, the past, now, the future
Emotional: anger, disgust, fear, happiness, sadness, surprise*
Extend the branches by association by directly writing and drawing on the map.
*Instead of having pre-set branches that guide the students’ thinking, the more advanced mode of mind-mapping is to capture the thinking pattern visually; as facilitator, you can decide according to the situation whether to use open-ended branches.
▸ Going back and forth (10 mins)
Try to locate the insights from previous sessions on the mind map, and generate new branches when necessary.
▸ Presentation and debriefing (20 mins)